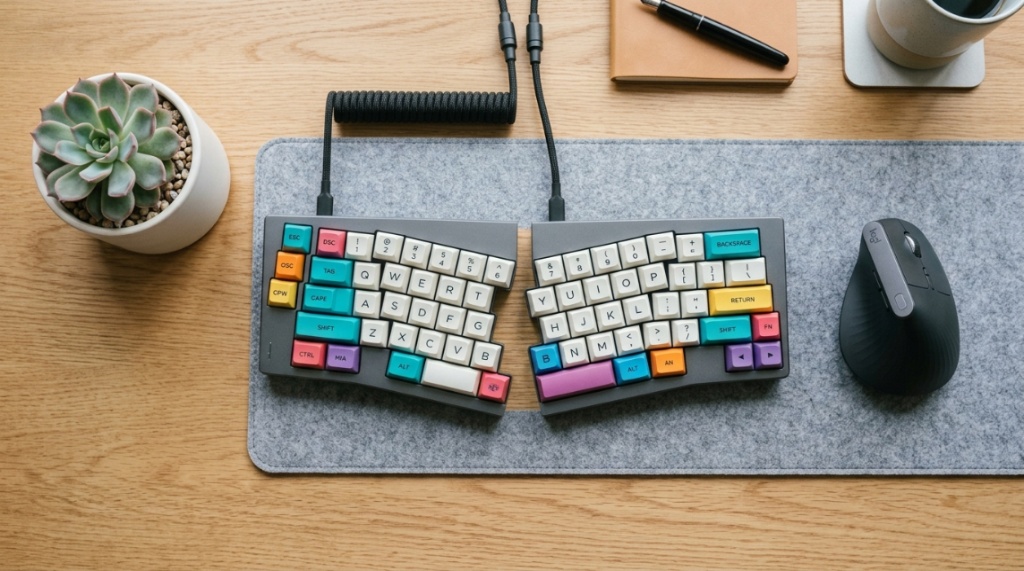
You’re reading this because your wrists ache after a long day of typing, or maybe you’ve started to feel a dull numbness in your fingers that wasn’t there last year. That discomfort isn’t just part of the job—it’s a warning sign. The standard flat keyboard forces your hands into an unnatural, pronated position, squeezing the carpal tunnel and straining tendons. The solution isn’t to type less; it’s to change your tools. Choosing the right split, tented, or curved board can be the difference between chronic pain and pain-free productivity. This guide walks you through every critical decision, feature, and trade-off so you can pick one of the ergonomic keyboards that save your hands without wasting money on gimmicks.
What Does “Ergonomic Keyboard” Actually Mean?
An ergonomic keyboard is designed to keep your wrists straight, shoulders relaxed, and arms at a natural distance—unlike traditional rectangular boards. They achieve this through a combination of physical angles, split designs, and curved key wells that accommodate the natural resting posture of your hands.
The Core Principle: Neutral Wrist Posture
Neutral posture means your wrists are not bent up, down, or sideways. A standard keyboard forces you to rotate your forearms inward (pronation) and angle your wrists outward (ulnar deviation). Ergonomic boards correct this by splitting the keys and adding a tent angle (raising the middle). This keeps the forearm and hand in one aligned line.
Types of Ergonomic Keyboards
- Split Keyboards: Two separate halves that align with shoulder width.
- Tented Keyboards: Angled upward in the middle to reduce forearm rotation.
- Curved Keywells: Concave surfaces that follow finger length differences.
- Angle-Adjustable: Allow you to change the negative tilt to keep palms flat.
Why Not Just Use a Wrist Rest?
Wrist rests offer cushioning but don’t fix posture. They encourage resting your wrists, which increases pressure on the carpal tunnel. True ergonomics is about floating hands and straight alignment, not a softer surface to lean on,While optimizing your workstation for productivity and long hours at the desk, choosing the right digital tools is just as important as physical ergonomics. If you manage property portfolios alongside your daily desk work, check out our guide on Best Real Estate Investment Management Software to streamline your operations.
Why Your Current Keyboard Is Slowly Damaging Your Hands

Using a conventional keyboard for over 20 hours a week creates repetitive strain on the median nerve and forearm muscles. The risks are not theoretical—they lead to real diagnoses like carpal tunnel syndrome, cubital tunnel syndrome, and tendinitis.
The Physics of Typing Pain
When your wrists are angled outward, the tendons rub against bone and ligament sheaths. Over time, this friction causes inflammation, which compresses the median nerve, leading to tingling, weakness, and pain that radiates into your thumb and index fingers.
Early Warning Signs You’re Ignoring
- Aching or burning sensation in wrists or palms
- Numbness in fingers, especially at night
- Weak grip or dropping items frequently
- Pain that increases after typing but also lingers after work
The Cost of Ignoring Ergonomics
Beyond the physical toll, chronic hand pain leads to lost productivity, expensive medical visits, surgeries, and even disability. A quality ergonomic board is a fraction of the cost of one surgical procedure. Think of it as health insurance for your livelihood.
How to Determine the Right Split Angle for Your Body
There is no one-size-fits-all angle. The ideal split is shoulder-width apart, which allows your upper arms to hang relaxed without flaring elbows. The tent angle should be between 15 to 30 degrees, but starting low and adjusting daily is the best approach.
Measuring Your Ideal Shoulder Width
Sit at your desk, relax your arms, and let your hands fall naturally above the keyboard tray. The distance between your hands is your shoulder width. Look for a keyboard that matches this, or a split model that allows independent positioning.
Tent Angle: Start Low, Increase Slowly
A severe 30-degree tent feels odd for the first week. Start at 10 to 15 degrees and increase by 5 degrees every few days. Your forearm muscles need time to adapt. Stop if you feel friction at the shoulder, as that indicates too much rotation too fast.
Testing with a DIY Setup
Before spending money, mimic the split angle by placing two standard keyboards side by side (disconnected). Type for 30 minutes. If you feel relief, you know exactly what split you need.
Which Key Switch Type Works Best for Painful Joints?
For sore hands, linear switches (like Cherry MX Red) are often better than tactile or clicky ones because they require less force and have no bump resistance. However, lighter springs can cause bottoming out, so aiming for a spring weight between 45g and 55g is typically comfortable.
Why Tactile Switches Can Be Problematic
Tactile switches give feedback at the actuation point, but your fingers must overcome that bump. Over 10,000 keystrokes a day, that extra resistance adds up. For severe pain, linear switches are gentler.
Preferred Switch Options
- Silent Red (Linear): Smooth and quiet; no tactile bump.
- Brown (Light Tactile): Good for those who need feedback without heavy force.
- Topre (Electrostatic): Soft with a cushioned bottom-out, but more expensive.
Checking Actuation Force
Look for switches with a bottom-out force under 60g. Heavier springs (like Cherry Green) will exacerbate joint pain. If you’re using a membrane keyboard, the feeling is usually mushy and hard to control, so switching to a mechanical with light linear switches is a game-changer.
When Should You Consider a Low-Profile Ergonomic Keyboard?
Low-profile boards are ideal if your desk setup forces you to type without a negative tilt or if you prefer a shorter key travel. They maintain the wrist in a neutral posture while reducing finger curl, which is beneficial for those with arthritis in the finger joints
Key Travel and Joint Strain
Standard mechanical switches have 4mm of travel. Low-profile switches have about 3mm. For painful fingers, less travel means less flexion and extension, which reduces inflammation.
Comparing Low-Profile vs. High-Profile
| Feature | Low-Profile | High-Profile |
|---|---|---|
| Key Travel | 1.2mm to 3mm | 4mm |
| Wrist Angle | Flatter, easier negative tilt | Requires more rest height |
| Finger Fatigue | Less curl required | More curl, more fatigue |
| Best For | Arthritis and joint pain | General typing comfort |
What to Check in a Low-Profile Board
Ensure the board has a tenting mechanism or a wrist rest that doesn’t force extension. Low-profile boards that are also split (like the Logitech MX Mechanical) are excellent but check the tent angle—some are fixed flat.
How to Test Ergonomic Keyboards Before Buying (Without Risk)
You can’t judge an ergonomic keyboard by typing for five minutes in a store. You need to assess thumb placement, key stagger, and whether your hands are truly floating. Use online return policies to test a board for at least 14 days.
The Two-Week Rule
Your brain and muscles need time to build new motor patterns. If you feel worse in the first three days, that’s normal. By day eight, you should see a reduction in baseline discomfort. If not, return it.
Signs the Keyboard is Right for You
- Your elbows are at a 90 to 110 degree angle
- Your wrists are straight, not resting on the desk
- You can barely see the back of your hands while typing
- Shoulders are relaxed and not elevated
What to Do During the Trial
Do not switch back to your old keyboard. Type for 2 hours daily, but take breaks. Adjust the tent and tilt every few days. Keep a diary of pain levels. This data will tell you if you’re on the right track.
Can a Split Ergonomic Keyboard Help If You Already Have Carpal Tunnel?
Yes, a split keyboard can significantly reduce symptoms, but only if you also change your desk height and break habits. It helps by removing ulnar deviation, which is a major factor in median nerve compression.
The Role of Negative Tilt
For carpal tunnel patients, the keyboard should have a negative tilt (front higher than back). This keeps your wrists in extension (neutral). A split board with adjustable feet is critical.
Combining with Ergonomic Mouse
It’s ineffective to fix your keyboard hand while your other hand is still tilting a standard mouse. Use a vertical mouse or trackball alongside your split keyboard. Both hands must be aligned.
Physical Therapy Integration
Even the best keyboard won’t heal damaged tissues. You need nerve glides and stretching to complement your new setup. Consider the keyboard as a preventive tool, not a cure. If pain is severe, consult an occupational therapist with your keyboard in hand for advice.
How Much Should You Spend on an Ergonomic Keyboard?
Budget-friendly models range from $50 to $100, while premium split mechanicals can cost $300–$500. The price determines build quality, programmability, and tent options, but not necessarily pain relief. Start with a mid-range model unless you have specific joint needs.
Budget vs. Premium: What Are You Paying For?
- Under $80: Rubber dome or basic mechanical, fixed angle, minimal adjustment.
- $100–$200: Quality mechanical switches, adjustable feet, maybe a detachable palm rest.
- $250+: True split halves, full tenting, per-key custom mapping, wrist rest inclusions.
Where to Skip Features
Avoid paying extra for RGB lighting, media keys, or macro pads if your only goal is ergonomics. Focus on adjustability and switch type. A plain keyboard with a good tent is better than a feature-rich flat board.
Value of Warranty and Returns
Ergonomic keyboards are very personal. Companies like ErgoDox and Kinesis have good return policies but are expensive. Check that the retailer offers free returns—paying $15 in shipping beats being stuck with a $200 paperweight.
Which Ergonomic Keyboard Layout Is Easiest to Adapt To?
The easiest adaptation is a fixed split (like the Microsoft Sculpt) where the keys are separated but still one piece. The hardest is an ortholinear or columnar layout (like the Ergodox) because it changes the key stagger drastically.
Traditional Stagger vs. Columnar Stagger
Traditional staggered rows follow the horizontal offsets of a typewriter. Columnar stagger arranges keys vertically, matching finger length. Columnar is more ergonomic but takes weeks to learn because your muscle memory is wrong.
Best for Beginners: Standard Split
Look for a split with a standard QWERTY layout, like the Perixx or Logitech Ergo K860. These have a gentle curve and a slight tent, but all keys are in the usual place. You get most of the benefit with minimal learning curve.
For Advanced Users: Ortholinear with Layers
If you touch-type well and want maximum control, consider boards like the ZSA Moonlander. But be prepared to recalibrate your typing for 3-4 weeks. For most people, this time is too costly.
Is a Mechanical Ergonomic Keyboard Worth the Extra Noise and Cost?
Yes, if you type over 4 hours daily. Mechanical switches provide predictable actuation points and don’t wear out like rubber domes. They also allow you to choose lighter springs, which reduces finger effort and pain.
Comparing Mechanical vs. Membrane for Pain
| Factor | Mechanical | Membrane |
|---|---|---|
| Durability | 50M+ keystrokes | 1-5M keystrokes |
| Key Force | Customizable (45g-70g) | Usually heavy, uneven |
| Actuation Feel | Clear and consistent | Mushy or stiff |
| Repairability | Easy to swap parts | Disposable |
Quiet Options
Loud clicks are irritating for office mates. Use switches with O-rings dampeners, or choose silent linear switches (like Silent Cherry MX Reds or Gateron Silent Browns). This gives you ergonomics without noise complaints.
Life-Cycle Cost
Membrane keyboards last 1-2 years before keys stick. Mechanical boards last 10+ years. Over a decade, a $200 mechanical is cheaper than replacing cheap membrane boards six times. Better for your hands and your wallet.
How to Set Up Your Workstation to Maximize Ergonomics
Your keyboard cannot fix a workstation that is too high. The keyboard should be at or slightly below elbow height. Your feet flat on the floor, and the monitor top at eye level. Without these, even a $500 board won’t save you.
The Keyboard Height Trap
If your desk is too high, you’ll shrug your shoulders to reach the keyboard. This tension travels down to your wrists. Use a keyboard tray to position the board 1-2 inches below your elbows, not above.
Positioning the Split Halves
If you have a fully split keyboard, angle each half inward like an open book. The left half should be rotated about 20 degrees counterclockwise and the right half clockwise. This forms a gentle inverted V structure.
Monitoring Your Posture Weekly
Take a photo of yourself typing every Friday. Look for slumping shoulders or floating elbows. Adjust your chair height instead of reaching for the keyboard. This simple audit prevents regression into bad habits.
Frequently Asked Questions
Can an ergonomic keyboard make me type faster?
Not immediately. You may type slower for the first week due to adaptation. But once posture is corrected, many users report increased speed because they experience less pain and fewer interruptions from cramping.
How long does it take to get used to an ergonomic keyboard?
Typically 1 to 3 days for fixed split designs, and 2 to 4 weeks for fully split or ortholinear boards. You should avoid switching back and forth during the adjustment period to allow muscle memory development.
Do I need a wrist rest with an ergonomic keyboard?
No, resting your wrists while typing actually increases carpal tunnel pressure. Use a palm rest only when pausing between typing bursts. The goal is to keep your hands floating while typing, and rest them only during breaks.
Are expensive ergonomic keyboards worth it compared to cheap ones?
Not necessarily for comfort. A $60 board with basic tenting can relieve pain. The extra cost of a $300 board buys adjustability, quality switches, and programmability, but you don’t need those for basic pain relief.
Can a keyboard alone prevent carpal tunnel syndrome?
No, but it’s a critical component. You also need to take microbreaks, stretch, maintain desk height, and use proper posture. The keyboard is a tool, not a cure.
Should I buy a used ergonomic keyboard?
Yes, if you’re on a tight budget, but be cautious about wear on mechanical switches. Clean it thoroughly and replace the keycaps. Most ergonomic boards are durable and last years.
What is the best tent angle for typing?
Research suggests a tent angle between 15 and 30 degrees is most effective for reducing forearm pronation. Start at 10 degrees if you’re a beginner and gradually increase to avoid shoulder strain.
Conclusion
Choosing ergonomic keyboards that save your hands involves more than picking a weird-looking board off a shelf. You need to assess your shoulder width, set the correct tent, select low-force switches, and give yourself at least two weeks to adapt. The best keyboard in the world won’t help if your desk is too high or if you keep using a standard mouse. Start by measuring your posture, then prioritize split designs with adjustable tent.
Don’t wait until the pain is unbearable. Take action today: measure your elbow height, test a low-profile split board for a week, and listen to your body’s feedback. Your future pain-free joints will thank you.
Ready to upgrade? Explore the best ergonomic keyboards that fit every budget and make the change that saves your hands.